on the bed, under the right pillow
on the chest in front of the bed. Once it opens, drag the clothes out of the way to reveal a hammer. Take it. Note the pattern of the chest bottom.
on the mirror located in the scene with the exit door. Take one of the broken mirror pieces after the mirror is shattered.
on the right red chair in the scene with red curtains. Cut through the chair fabric to take the key. The key is for the box with little butterflies on it. (Please read the steps "Get torch" to find out how to get the butterflies box)
in the nightstand drawer, located next to the bed.
on the nightstand, located next to the bed.
on the mirror stand, located in the scene with the exit door.
in the drawer of the mirror stand, located in the scene with the exit door. Note a key inside the candle. To get it, please read the steps "Get torch".
on the brick wall with nothing but two torches. Take the right one.
enlarge the candle with key inside and use torch on it. Take the key after the candle is burnt.
Under the table located in the scene with red curtains there is a key hole. Use candle key on it to get the box with little butterflies.
Use the key obtained from the red chair.(please read the steps in "Get chest key" to find out how to get the key from the chair). Once the box is opened, take a picture of a frog and a hint for chest pattern.
Open the chest, drag the clothes away and click on the upper area of the pattern, indicated on the pattern hint. This would zoom in on the area. Click on the second blue circle, which is indicated by an arrow on the pattern hint. The pattern would turn into a name tablet.
As you might have realized by looking at the Alister family tree, Anna does not belong to the Alister family, therefore Anna Ali is not her real name. Rearrange the syllables to get another name. To do so, click on a syllable which would select it and then click on another syllable which would swap them. After you get the correct name, Alianna, the name tablet would turn into a tablet with an arrow.
The arrow points towards the brick wall with nothing but two torches. Once there, it would point to the secret brick. When you click on it, it would slide out revealing a hidden spot. Collect a picture of a swan, a letter and a cd from inside. After items are collected click on the back of the hiding spot to zoom in on it revealing the levers. For further details please read "The levers" hint.
The levers are located at the back of the hidden place behind the secret brick. To find the secret brick, please follow the steps described in the hint "Use hint for chest pattern" above.
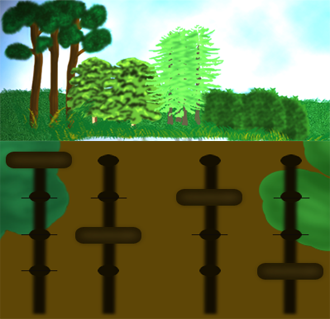
The hint can be found in the view from the window behind the red curtains - the height of the trees. Once the levers are placed correctly, click on the red button, which would open a secret passage.
First lever: first mark at the top (highest tree), second lever: third mark from the top, third lever: second mark from the top, fourth lever: fourth mark from the top (shortest tree).
Select the torch and then click on the passage entrance because it's too dark.
The quotes under the portraits of the famous people are not displayed in the correct order. Move the quotes under the portrait of the person who said it.
Miguel de Cervantes: Wit and humor do not reside in slow minds, Galileo Galilei: And yet it moves, William Shakespeare: To be, or not to be: that is the question, Francois de La Rochefoucauld: The intellect is always fooled by the heart.
After the portraits are arranged correctly, the stairs will be lit up and a green light will start blinking. Click on the light to scan a finger. It would open the wall to reveal a secret door. To open the door, please follow the steps in the "The pipe puzzle" hint.
Located on the right from the portraits (if facing portraits). Move the lever to draw a house without going over the same line twice.
Possible solution: click on the house upper right corner,
then upper left corner, then the top of the house, then the upper right corner, then the bottom right corner, then the upper left corner, then
bottom left corner, and finish at the bottom right corner.
Once the pipe is opened, take a picture of a snake and a picture of a simplified rose.
on the hidden door revealed by the blinking light. (To find the door, please follow the steps described in "The portraits" section.
The picture of a rose on the door is disordered. Use the little picture of the rose in inventory to correctly rearrange some of the pieces, so that the rose on the door looks exactly like the rose on the pic.
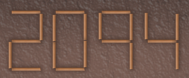
the sticks can be moved, so other numbers can be formed
is on the cd. To clean the dirt off the cd, use makeup remover
Inside, you will get a little picture and two metal objects.
has 4 empty slots, where you can enter four square pictures
If you look carefully at the painting after you put in the missing pieces you will see 4 numbers
7482
Click on the second torch from the left to zoom in. To get close to it, you will need to
extinguish the fire.
Use the vase with water on it
The numbers for the code behind the torch are revealed by the painting. Please follow the steps described in the "Painting in the back of the room" hint. Once code is entered, an ipod is revealed. Take it.
Put in the two metal sticks with the spheres at the end on the object.
They are located inside the birthday tablet. Solution for opening the tablet is described in the "Open birthday tablet" hint.
Place the ipod between the two sticks, which will open the time portal. Go into the portal....and you're done!...Until the next episode
Are you using ad blocking software? Please stop being so cruel.

Video Walkthrough
Are you using ad blocking software? Please stop being so cruel.