Top of the window has a puzzle with 4 buttons and 5 white latches. Each button makes certain latches change position (either go up or down). You need to move all latches down by pressing the correct buttons. The solution for it is very simple. You need to press three of the four buttons in any order. Second button should be excluded. After completion, the window will slide up revealing a couch with a rope on it. Read the next step to learn how to use the rope.
You need to pull the lever on the left from the table down. However, since it's too high up, you need something to reach it...something like a rope. To get a rope, follow the steps above called 'Window under the balcony'. After the table and chair is lowered to the floor, there will be a yellow shape on the chair and a frying pan on the table. Get both. Use frying pan on the stove. Follow the steps in the 'Stove' described next.
Put the frying pan on the stove. To get the frying pan, follow the steps above. Pour cooking oil into it. The cooking oil can be found next to a plant on top of the nightstand. Turn the stove on by clicking the second knob on the left. A code will be revealed. To use the code, follow the steps below titled 'Tv'.
Enter he code revealed in the previous section titled 'Stove'. The tv and the stand will be lowered to the floor. Click on it to get closer then click on the dvd player to insert a disk. The disk can be found under the stairs. Another code will be revealed on tv after the disk is inserted. The code is for the nightstand. Next to TV, there is a key. Pick it up. To use the key, read part 3 of this walkthrough.
To get the code for the nightstand follow the section described above titled 'TV'. Inside there is a paper with a hint and a handle. To use handle, follow the steps in Part 4. To use the paper with a hint, read Part 2.
There are 5 directions in total. First direction is given by the paper found inside the nightstand drawer. Second direction is written on the stairs. Third direction is on the stand under the tv. However, you have to lower both of them to the floor first. To do so, follow the steps, described in 'TV' in Part 1. Fourth direction is written on the table, which you also have to lower to the floor. Follow the section 'Table with chair' to learn how to do that. Fifth direction is written on the wall on top of the stairs. It's also where you enter the code given by all the directions.
The word to be used with the directions is the word ESCAPE written on the paper found inside the nightstand. First direction asks you to put the rightmost letter after the third one on the left. The rightmost letter is E. Third one is C. After the first direction, you should have ESCEAP. Second direction asks you to take the second letter from the left (which is S) and move it to the end of the word resulting in ECEAPS. Third direction asks you to take the first letter on the left (which is E) and move it after the first letter of the alphabet (which is A) resulting in CEAEPS. Fourth direction asks you to substitute the letter that appears twice with a letter O both time. Letter that appears twice is E, so you should end up with COAOPS. The fifth and last direction asks you to remove the last letter as well as the first letter of the alphabet, which will give you the final code to be used, COOP. Enter it above the stairs and the stairs will be moved to the correct spot on the left.
After the window is raised, you will see there is a blue shape on the window pane behind the glass. However, window is locked. Please read part one to learn where to get the key and how to raise the window.
The green shape is located on the balcony, but until the stairs are moved to their correct spot on the left, you won't be able to reach it. Please read Part two to move the stairs
Yellow shape will be on the chair next to the table once they are lowered to the floor. Read part 1 to learn how to lower table and chair.
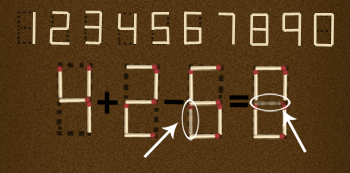
Before placing a match on a new spot, make sure that the numbers you are about to change correspond to the shapes given at the top. For example, 9 is written differently than 6 if you flip it.
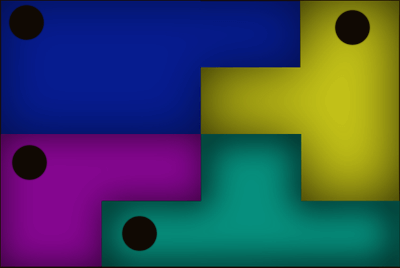
The shapes go above the nightstand next to the couch. Try to place them in such a way that they all fit. After you do so, a code will be revealed. Please note that the upper left most corner of the blue and the purple shape will be placed on the spot you click. When it comes to the green shape, it will be the left most corner that will go to the spot you click. And when it comes to the yellow shape, it will be the top most spot of the shape.
The circles indicate where you need to click for the shape to be placed in that spot
To move the upper part of the door down, you need to enter the code. Follow the directions in part 3 to get the code.
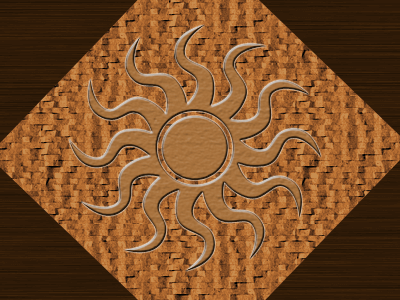
Rearrange the squares to make up a picture. The 4 squares in the corners are already done. Upon completion, you will be given a picture hint and a paint brush
First, you need to obtain a paint brush and a paper hint given by the floor puzzle. The paper hint shows the final result you need to achieve. You are given three primary colors: red, blue and green. Combining all three gives you white. Combining two of the three gives the colors indicated on the paper hint.

After triangles are colored correctly, they will reveal two holes. Place a handle you got from the nightstand there and click on it to rotate. Pipes wil be corrected and you will be given the door key. Use it on the door after it's assembled and you're done!
Are you using ad blocking software? Please stop being so cruel.
Video Walkthrough
Are you using ad blocking software? Please stop being so cruel.